
Common Security Domain Administrator Tasks
in Authentication Manager v8.x
Jason White
Iowa State University
IT Services
- Security Console Login
- User Management
- Token Management
- Agent Provisioning
This documents serves as a quick-reference guide for performing basic security domain administrator tasks. It is not meant to replace the official RSA SecurID Authentication Manager Administrator’s Guide.
There may be multiple paths to a given configuration screen or ways to perform a given action. This document only shows one of them.
Security Console Login
The ITS SecurID implementation consists of two machines: a primary, and a replica. rsa-1, the primary, contains the read/write copy of the SecurID database while rsa-2 serves a read-only replicated copy of the primary’s database.
Agents and administrators may perform authentications and database modifications through either machine, but if rsa-1 is unavailable no write actions may be performed.
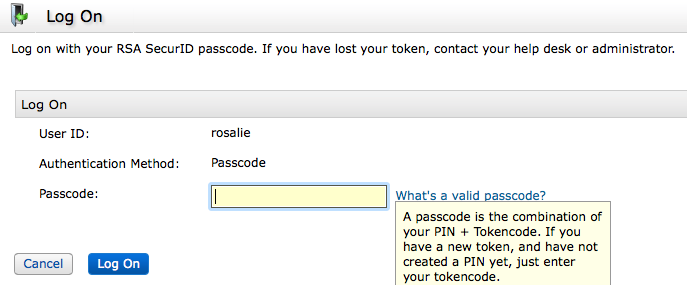
Login to the SecurID Security Console using one of the following URLs:
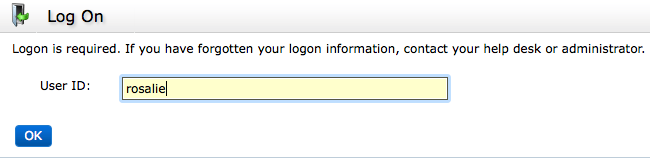 |
You will be prompted to enter your SecurID Passcode.
 |
User Management
Before a user can be managed by a security domain administrator, they must be placed in the appropriate security domain by a server administrator. Requests to place NetIDs into a security domain must be sent to its-securid-admins@iastate.edu. User IDs can only be placed in one security domain.
It is recommended that only users who will be assigned tokens be assigned to a security domain rather than assigning an entire department at once. This will cut down on the number of cruft entries in the database.
Once users are added to a security domain, you can list all the users in your security domain or search for a specific user.
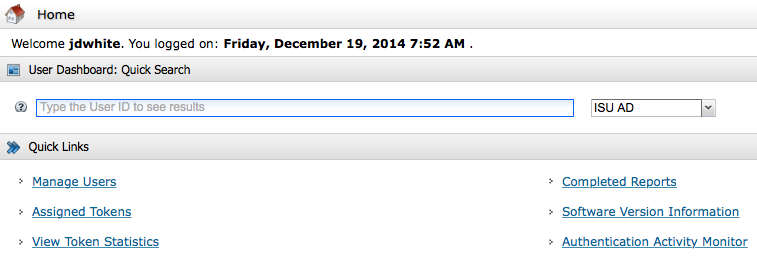
User Dashboard
Version 8 of the security console contains a Quick User Search feature available from the homepage. This is a very fast, efficient way to search for users in your security domain scope and access management functions.
Most of the examples in this document will start from the user dashboard.
 |
Type a User ID within your security domain scope:
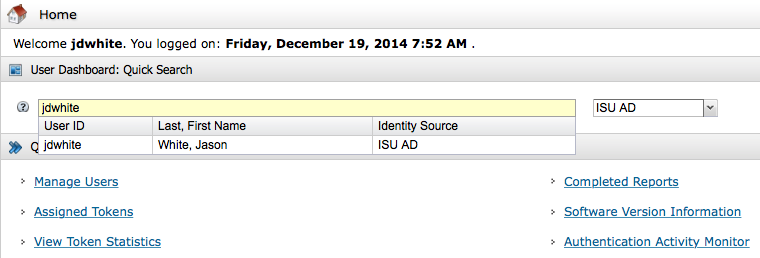 |
Select the row that you want to view to see the user dashboard.
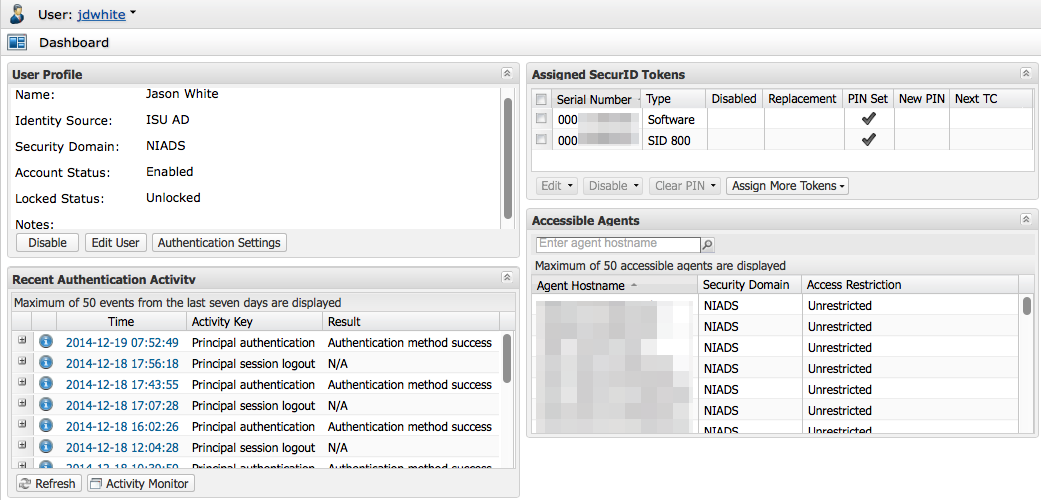 |
User Profile Window Fields
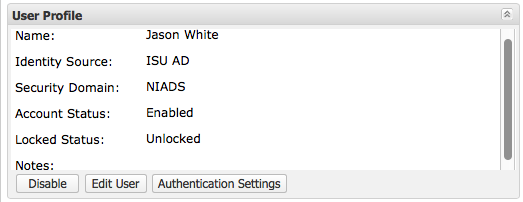 |
- Name
- Obvious.
- Identity Source
- The identity source is the data store where this user is saved. The ITS SecurID servers use Active Directory (ISU AD) as a read-only data source. Except in rare cases, this value will be ISU AD.
- Security Domain
- This user is managed by administrators whose administrative scope includes the selected security domain.
- Account Status
- Enabled or Disabled. When disabled and the user cannot authenticate.
- Locked Status
- Unlocked or Locked. When locked the user account was locked by the authentication manager for violations of
the lockout policy or the self-service troubleshooting policy for this security domain. Locked users cannot authenticate.
User Profile Window Actions
- Disable
- Disables the account. Disabled accounts cannot authenticate.
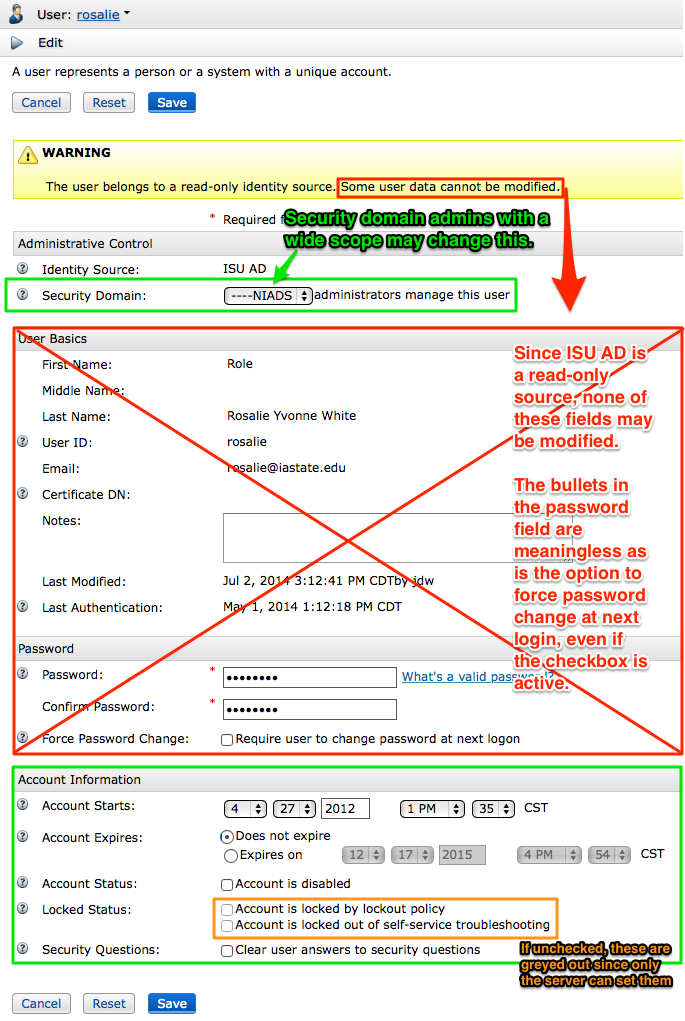
- Edit User
- Brings up the following dialog box:
The fields in the red box cannot be modified if the Identity Source is ISU AD (and unless you’re especially privileged it always will be) while values in the green boxes may be modified.
Administrative Control
- Security Domain
- Move the User ID to the selected security domain.
Unless you have been granted security domain administrative privileges in multiple domains there will be only one Security Domain listed here.Account Information
- Account Starts/Expires
- Sets the account Start and End dates. This isn’t generally used.
- Account Status
- If checked, the account has been locked out manually by a security domain administrator. Uncheck to enable this account.
- Locked Status
- If checked, the SecurID server has locked out this account in response to either a logout policy violation, a self-service troubleshooting policy violation, or both. Uncheck these to unlock the account.
- Security Questions
- Using the self-service console, users can set security questions. Checking these options will clear these security questions and they will be prompted to set them again the next time they login to the self-service console.
NOTE: since the self-service console is not enabled on the ITS SecurID server, no security questions can be set.Be sure to click the Save button to apply any changes.
Assigned SecurID Tokens Fields
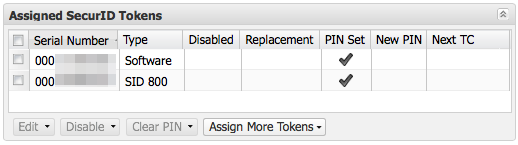 |
- Serial Number
- The token’s unique serial number. This value is found on the back of hardware tokens and in the information pane of a
software token. - Token Type
- Software for software-based tokens. Hardware-based tokens will show he model number of the token
such as SID 800 or SID 700. - Disabled
- A checkmark here indicates token is disabled. Disabled tokens cannot be used to authenticate.
- Replacement
- When replaced with Next Available SecurID Token is chosen, this field shows the token serial number of the replacement
token.
You likely don’t want to use the Replace with Next Available SecurID Token option. See Replacing Tokens for more information. - PIN Set
- A checkmark here indicates the token has a PIN set.
- New PIN
- A checkmark here indicates that the user must set a new PIN during the next successful authentication.
- Next TC
- A checkmark here indicates that the user must provide the next token code after the next successful authentication.
Assigned SecurID Tokens Actions
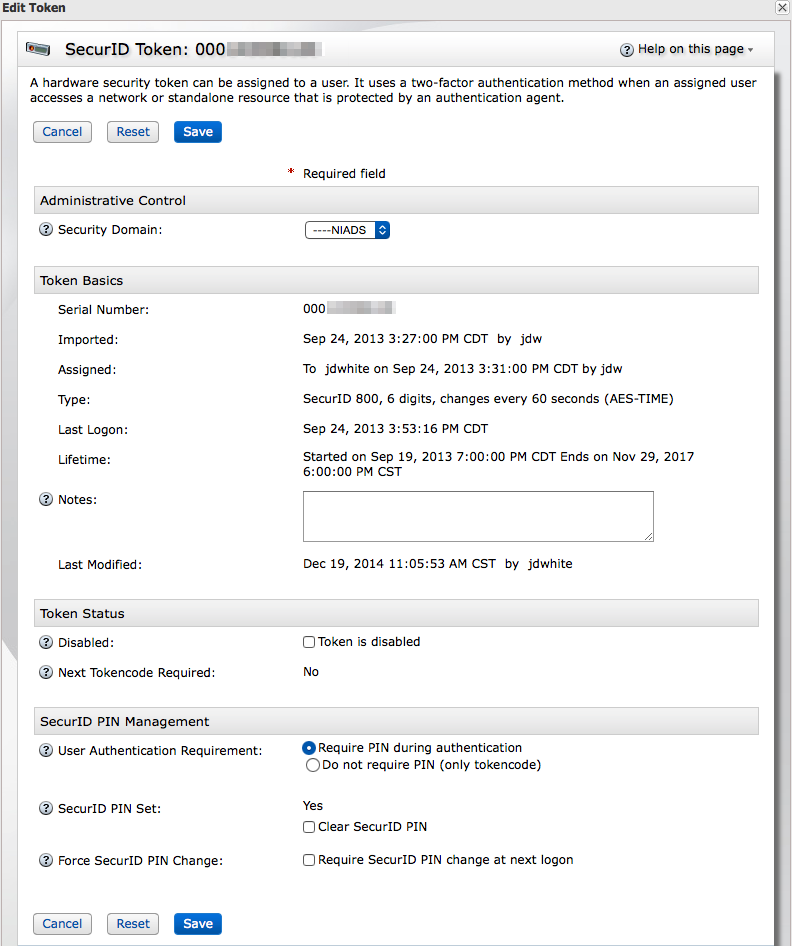
- Edit
- Brings up the following dialog box:
- Security Domain
- Change the security domain this token is managed by (admins with wide scope privileges only).
- Disabled
- Check
- User Authentication Requirement
- Require PIN during authentication is highly recommended.
Tokencode only is discouraged.- SecurID PIN Set
- Shows whether a PIN has been set and, optionally, allows the administrator to clear the PIN. If a PIN is required for authentication, the user will be prompted
to set a PIN after the next successful authentication where they will only enter their tokencode.- Force SecurID PIN Change
- Requires that the PIN for this token be changed after the next successful authentication, but does not clear the current PIN.
- Edit ↳ Distribute
- Distribute a soft token.
- Edit ↳ Replace
- Replace this token with another.
- Edit ↳ Unassign.
- Unassign this token from the user.
- Edit ↳ Emergency Access Tokencodes
- Manage emergency access token codes.
- Edit ↳ Resynchronize Token
- Resync the token.
- Disable
- Disable the token. Disabled tokens cannot be used to authenticate.
- Disable ↳ Enable.
- Enable the token.
- Clear PIN
- Clear this token’s PIN.
- Clear PIN ↳ Require PIN Change
- Require a PIN change after the next successful authentication.
- Assign More Tokens
- Assign a new hard or soft token.
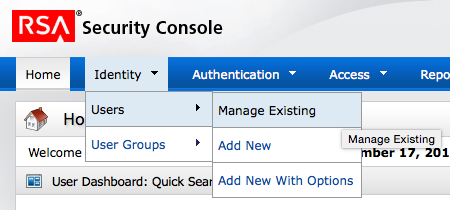
Searching/Viewing All Users
Alternatively, you may search/view all users in your security domain scope by selecting
Identity ↳ Users ↳ Manage Existing.
 |
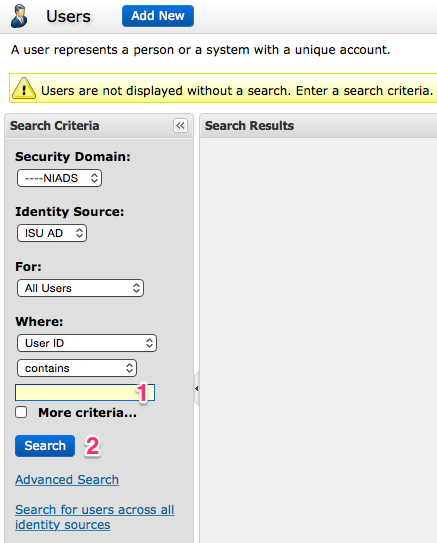 |
To list all users in your security domain, ensure the Search criterion are the
same as the example above and use a blank search query:
- Leave the Search box blank.
- Click the Search button.
 |
Note the people icons to the left of the User ID. The icons that contain the gold shield denote security domain admins for this particular this particular security domain scope.
To search for a specific User ID:
- Enter the User ID in the Search box.
- Click the Search button.
Note: it can take several seconds before the search results appear.
Token Management
Before tokens can be managed, they must be assigned to your security domain.
If you are obtaining tokens from ITS, send a token allocation request to its-securid-admins@iastate.edu with the number and type (hardware/software) of tokens you need and the security domain they should be assigned to. Only requests from security domain admins will be honored.
If you have purchased your own tokens for use with the ITS SecurID Service, the license and seed files must be imported into the SecurID server. Security domain admins may be able to do this themselves, or ITS can do this for you. Please contact its-securid-admins@iastate.edu for assistance.
DO NOT EMAIL THE TOKEN LICENSE OR SEED FILES TO THE SECURID SERVER ADMINS!
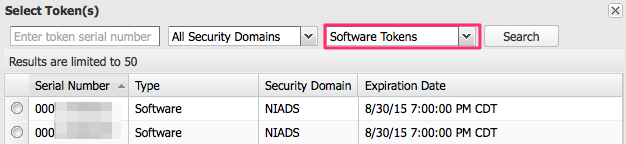
Viewing Tokens
Tokens can be displayed by security domain or by User ID.
By Security Domain
To view tokens in your security domain, select from the menu tabs: Authentication ↳ SecurID Tokens ↳ Manage Existing.
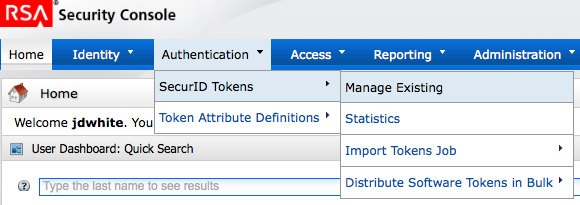 |
Tokens are divided into two groups: assigned and unassigned. Assigned tokens are tokens that have been
assigned/allocated to a particular User ID and unassigned tokens have not.
By User ID
Use the User Dashboard: Quick Search feature on the authentication manager’s home screen to bring up the desired user’s dashboard. The tokens assigned to that user will be displayed in the Assigned SecurID Tokens box.
- Note: a User ID can be assigned multiple tokens, but multiple User IDs cannot be assigned to a single token.
- If carrying around multiple hard tokens is burdensome, consider switching to soft tokens as the soft token generator
applications can hold up to 10 tokens.
The assigned tokens list contains following fields; unassigned tokens contain a subset of these fields.
 |
- Serial Number
- The token’s unique serial number. This value is found on the back of hardware tokens and in the information pane of a
software token. - Token Type
- SecurID Software Token for software-based tokens. Hardware-based tokens will show he model number of the token
such as SID800 or SID700. - Algorithm
- Typically this will read AES-TIME meaning that the value generated by the token changes periodically based on the
passage of time. You probably don’t need to care about this. - Assigned To
- The User ID the token is assigned to.
- Disabled
- A checkbox will appear here if the token is disabled. Disabled tokens cannot be used to authenticate.
- Enabled for Emergency Online Access
- This token is enabled to authenticate with a PIN and Emergency Access Tokencode. This is most often used when users
have misplaced or lost their token and need an emergency tokencode to allow them to authenticate. - Requires Passcode
- If checked, a Passcode consisting of a PIN + tokencode is required to authenticate. If unchecked, only the tokencode is required.
Tokencode only authentication is NOT recomended. - Pending Replacement By Token
- When Replace with Next Available SecurID Token is chosen, this field shows the token serial number of the replacement token.
You likely don’t want to use the Replace with Next Available SecurID Token option. See Replacing Tokens for more information. - Will Replace Token
- When Replace with Next Available SecurID Token is chosen, this field shows the token serial number of the token that
was replaced.
You likely don’t want to use the Replace with Next Available SecurID Token option. See Replacing Tokens for more information. - Dynamic Seed Provisioning Capable
- Software tokens only. Token seed can be initialized over the network rather than generating and sending a seed file (more information below under Software Tokens).
- Last Used To Authenticate
- Date and time of the last authentication using this token.
- Expires On
- The date and time the token license expires and the token is no longer usable for authentication.
- Security Domain
- The security domain the token currently resides in.
- Notes
- A free-form field for notations.
- SecurID PIN
- Indicates whether a PIN has been set or not.
- Token Status
- Indicates whether a token is usable within the authentication manager.
Assigning Tokens
Use the User Dashboard: Quick Search feature on the authentication manager’s home screen to bring up the desired user’s dashboard. The tokens assigned to that user will be displayed in the Assigned SecurID Tokens box.
- Click Assign More Tokens.
- Select Hardware or Software as appropriate.
A list of unassigned tokens will appear.
 |
If needed you can switch the token type by clicking the drop down arrow next to the token type.
- Click the button next to the token(s) you want to assign to this user.
SecurID 800: hardware token.
SecurID Software Token: any software-based token generator (iOS, Android, etc.) - Click Assign Token(s) at the bottom of the window.
Note: a user may have no more than 3 tokens assigned to them.
 |
Hardware tokens are now ready to be used.
Software tokens require an additional distribution procedure before they can be utilized.
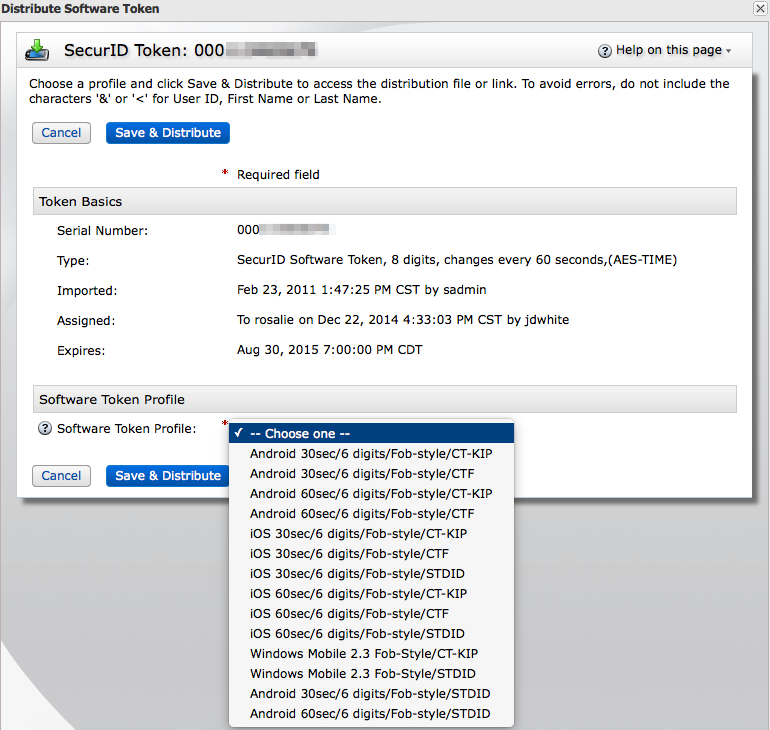
Distributing Software Tokens
Unlike hardware tokens, software tokens need to be configured before they can be used. The procedure for distributing this configuration file varies depending on the type of software token, user requirements/preferences, and preferred method of distribution. Administrator guides detailing provisioning procedures for various soft tokens/software authenticators can be found at: https://www.sitelicensed.iastate.edu/software/securid/SoftwareAuthenticators/.
As a general rule, it is recommended that soft token distribution files be password protected. Passwords should be communicated through an alternate channel (in-person, phone, encrypted chat) and not via email or SMS. Apple’s Messages application is an acceptable medium as it provides end-to-end encryption of the chat session.
Use the User Dashboard: Quick Search feature on the authentication manager’s home screen to bring up the desired user’s dashboard. The tokens assigned to that user will be displayed in the Assigned SecurID Tokens box.
- Check the box to the left of the soft token you wish to distribute.
- Click the down arrow next to Edit, select Distribute.
Starting with version 8 only software token profiles that have been created by the SecurID server admins can be selected for distribution. A number of combinations have been pre-created and one must be chosen in order to proceed with the distribution job:
 |
Not all devices support all the options listed below (for instance, Windows Mobile only supports 60 second durations and 6-digit tokencode lengths).
If you don’t see your particular device type list here, please contact its-securid-admins@iastate.edu to have it added.
The format of the profile names is:
device type / duration / tokencode length / style / distribution method
- Device Type
- The general class of device such as iOS, Android, Windows Mobile.
- Duration
- The length, in seconds, that a tokencode is displayed.
- Tokencode length
- The number of digits in the tokencode. 6 was chosen in order to mimic the behavior of the hard tokens and, hopefully, avoid confusion between those who use both soft and hard tokens.
- Style
- Fob-Style mimics the hard token; each passcode response is made of up the PIN followed by the tokencode.
- Distribution method
- The following soft token distribution methods are supported for most token types:
- SDTID
- A binary blob that is downloaded from the authentication manager, suitable for attaching via email. The recipient simply opens the .sdtid file with the token generator software to import it. This file may be installed on multiple devices.
- CTF (Compressed Token Format)
- Essentially a combination of CT-KIP and SDTID, this format contains a url with the binary token seed blob. This URL may only be used to a single device.
- CT-KIP
- A specially crafted URL that tells the token generator software how to fetch the token seed file from the authentication manager. This URL may only be used on a single device.
The choice of which format to use depends on the distribution medium and how many devices you wish to install the token on.
- URL-based distribution mechanisms (CTF & CT-KIP) may be problematic if sent via email as certain mail clients/servers can mangle the URLs. In these cases, attaching the token seed in SDTID format should be used.
- If a token is going to be installed on more than one device (such as a phone and a tablet), then SDTID files must be used.
NOTE: EMC does not recommend this, but in practice it works well provided that the devices sharing the token keep good time.
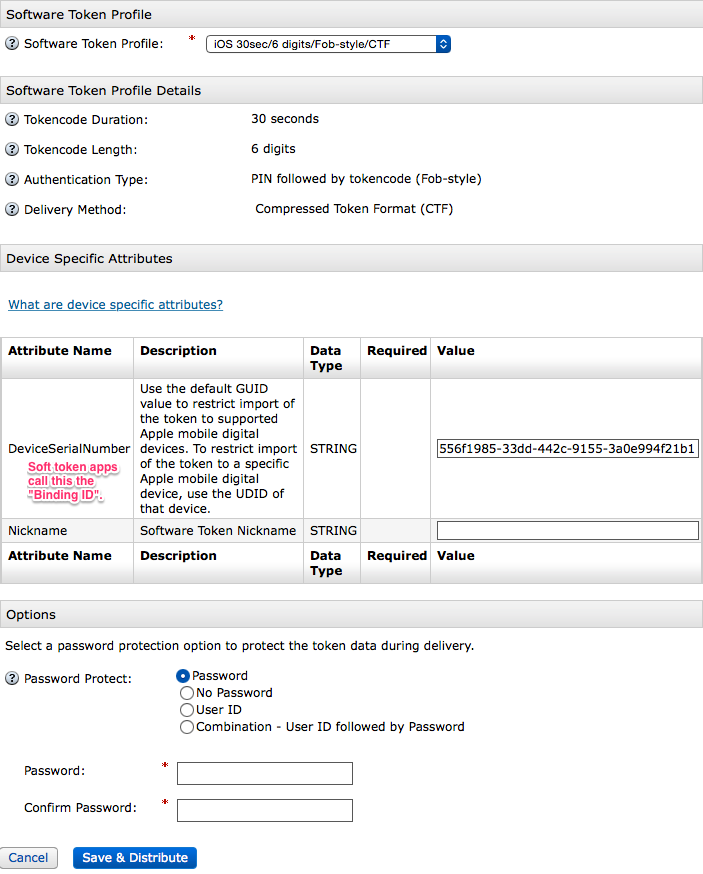 |
- Device Specific Attributes
- Optional: You may set a device specific attributes for this soft token so that only a specific device can import it.
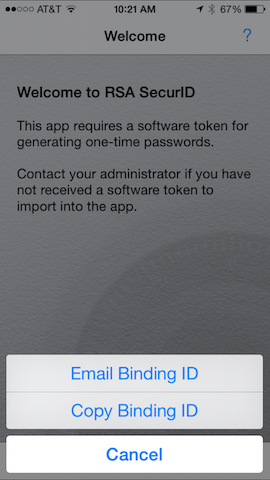
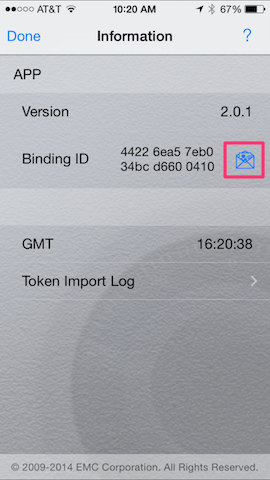
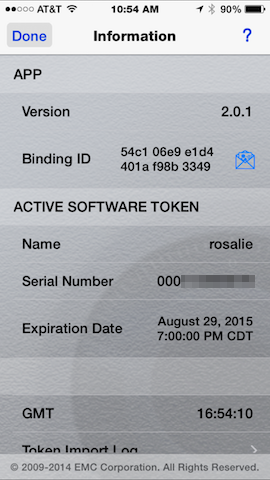
Obtain Device Binding ID
The device “serial number” (binding as it’s called in the application) can be obtained from the software token application.
 |
 |
 |
| With no imported tokens this will be shown. |
The Email and Copy Dialog. | Displayed Binding ID. Tap the letter icon to email. |
- Options
- Password Protect: password protect this soft token (recommended)
After entering data in the optional fields, click Save & Distribute.
Soft Token Distribution (CTF)
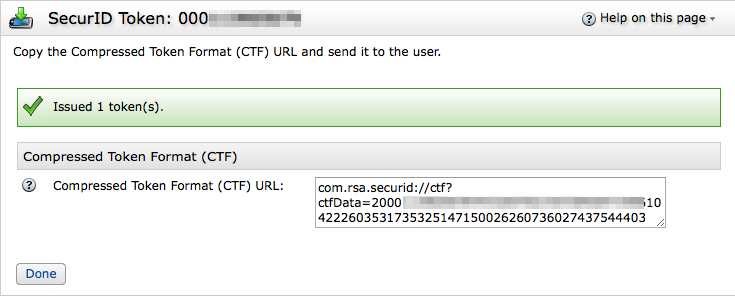 |
- Cut and paste this URL into an email or secure instant messaging application.
- Communicate the password to the user via a secure back channel such as in-person, voice, or secure instant messaging.
Soft Token Distribution (SDTID)
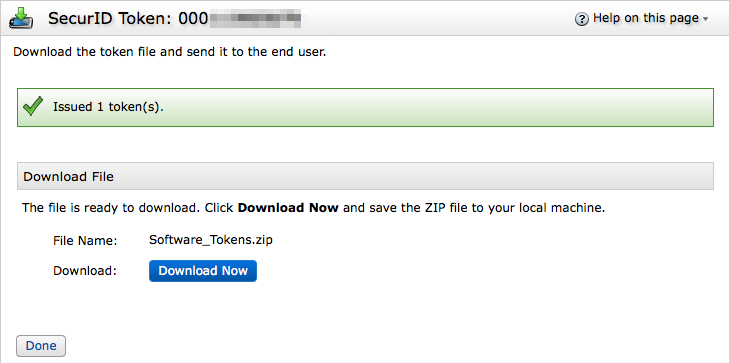 |
- Click Download Now to download the Software_Tokens.zip file.
- Extract the .sdtid file from the ZIP archive.
- Send the .sdtid file via email or other medium.
- Communicate the password to the user via a secure back channel such as in-person, voice, or secure instant messaging.
iOS Soft Token Import (CTF)
Example showing reception of a soft token in CTF.
 |
| CTF blob received via Messages. |
Tap the message to import.
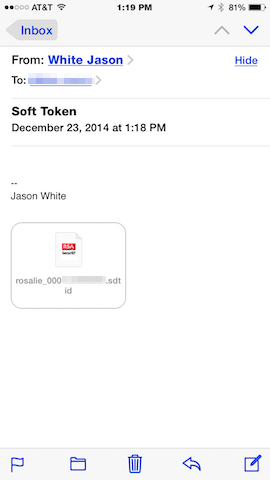
iOS Soft Token Import (SDTID)
Example showing importation of a SDTID file sent via email on iOS:
 |
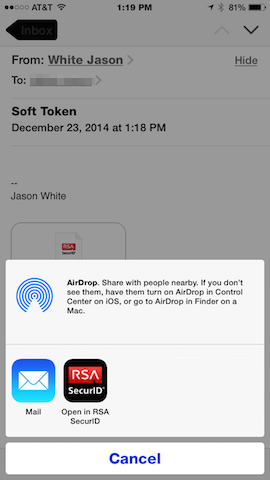 |
| Tap the attachment. | Select Open in RSA SecurID |
iOS Soft Token Import (common)
After the token seed is sent to the soft token app, proceed with importation:
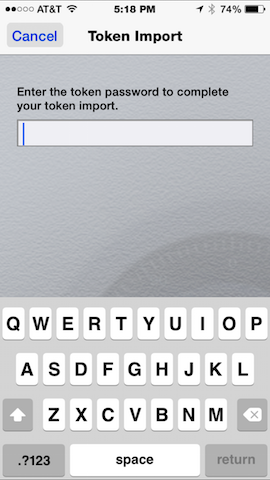 |
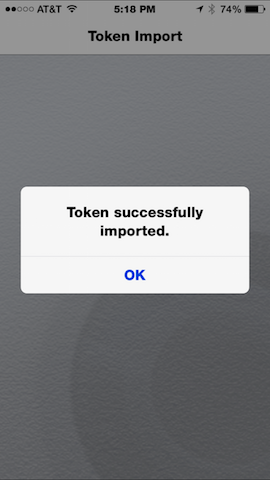 |
| Enter password (if prompted). | Token is imported. |
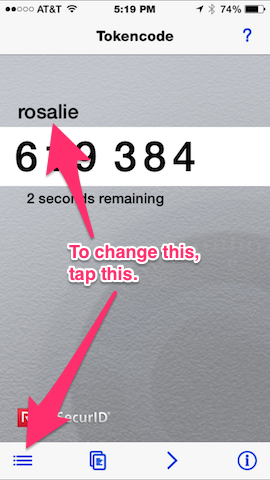 |
 |
| App. generating tokencodes. | Token information. |
Disabling Tokens
Use the User Dashboard: Quick Search feature on the authentication manager’s home screen to bring up the desired user’s dashboard. The tokens assigned to that user will be displayed in the Assigned SecurID Tokens box.
- Check the box to the left of each token you wish to disable.
- Click Disable.
Replacing Tokens
Use the User Dashboard: Quick Search feature on the authentication manager’s home screen to bring up the desired user’s dashboard. The tokens assigned to that user will be displayed in the Assigned SecurID Tokens box.
- Check the box to the left of each token you wish to disable.
- Click the down arrow to the right of Edit and select Replace.
- Click the button next to the token you want to assign to this user.
- Click Replace token.
The order in which you perform these steps depends on the situation. If the user’s token is lost/stolen then you will want to disable the token immediately before assigning a new one. If the user is transitioning from one token type to another then you will want to assign them the new token, ensure that it works for them, and then disable the old token.
| A NOTE on the Replace With Next Available SecurID Token Option |
|---|
| If you go an alternate route to token replacement you may notice the Replace with Next Available SecurID Token option, which will select the next available (unassigned) token and assign it to the User ID. This option is not desirable for the following reasons: * It does not take the token type into account when selecting the next available token. If your user currently has a hardware token and the next available token is for a software token, the software token will be assigned to replace the hardware token. By performing the assignment manually the security domain administrator can ensure that the proper token type is assigned. * Depending on how many unassigned hard tokens you have laying around, it may be easier to grab one at random and assign it rather then try and find a specific token out of many. |
PIN Management
Use the User Dashboard: Quick Search feature on the authentication manager’s home screen to bring up the desired user’s dashboard. The tokens assigned to that user will be displayed in the Assigned SecurID Tokens box.
- Clear PIN
- To clear an existing PIN from a token:
1. Check the box to the left of each token you wish to disable.
2. Click Clear PIN - Require PIN Change
- To require that a user change their PIN after the next successful authentication:
1. Check the box to the left of each token you wish to disable.
2. Click the down arrow to the right of Edit and select Require PIN Change.
Emergency Access Tokens
In circumstances where the user has forgotten their token (not lost! – lost tokens should be disabled) or the token has become physically damaged and a new one can not be physically issued, temporary access tokens can be generated.
Tokens can be generated for online and/or offline access.
- Online Access
- The authenticating agent has network connectivity and is able to authenticate against the SecurID servers.
- Offline Access
- The authenticating agent does not have network connectivity or is unable to authenticate against the SecurID servers.
| A Cautionary Note |
|---|
| First, a word of caution. You may discover that if you hit the drop down arrow to the right of a User ID there’s an option called Manage Emergency Offline Access. This will display the following message: |
 |
| There are two important things to note about this message: 1. This message is referring to Passcodes, not Token codes. Global policy currently prohibits the creation of emergency Passcodes. By only allowing the creation of Token codes, the user will still need to know and provide their PIN during authentication. 2.The message “Emergency Offline Access is not enabled for this user” at best refers to the use of Offline Access Passcodes and not Emergency Offline Access in general. |
| This option and screen above should be ignored. |
To manage Emergency Access Tokencodes:
Use the User Dashboard: Quick Search feature on the authentication manager’s home screen to bring up the desired user’s dashboard. The tokens assigned to that user will be displayed in the Assigned SecurID Tokens box.
- Check the box to the left of the token you wish to manage.
- Click the down arrow to the right of Edit and select Emergency Access Tokencodes.
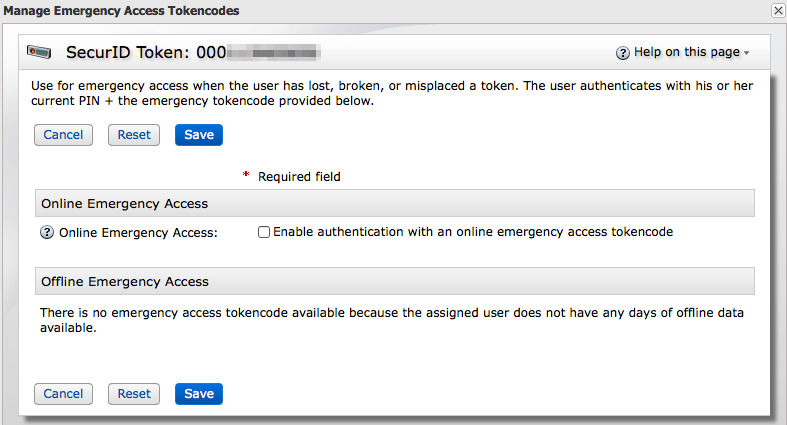 |
| This window will look different if Online Emergency Access was previously disabled or Offline Emergency Access tokencodes have already been downloaded by an agent. |
If Online Emergency Access is enabled, a pane like the following will be shown:
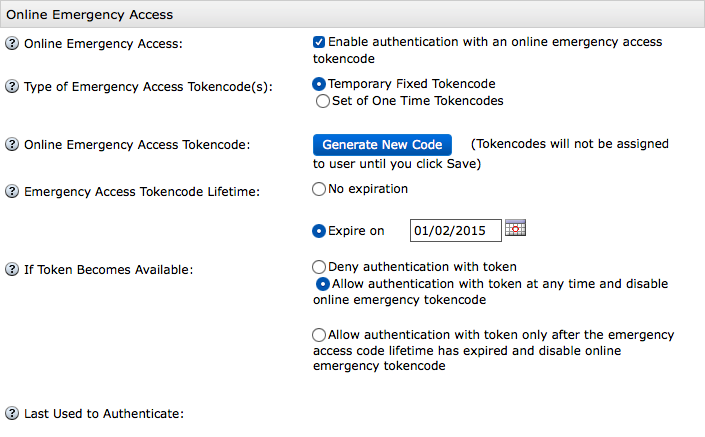 |
Types of Emergency Access Tokencodes:
- Temporary Fixed Tokencode
- A tokencode that can be used repeatedly until it expires.
NOT recommended. - Set of One Time Tokencodes
- A set of tokencodes that can only be used once.
If One Time Tokencodes is selected, these additional options are displayed:
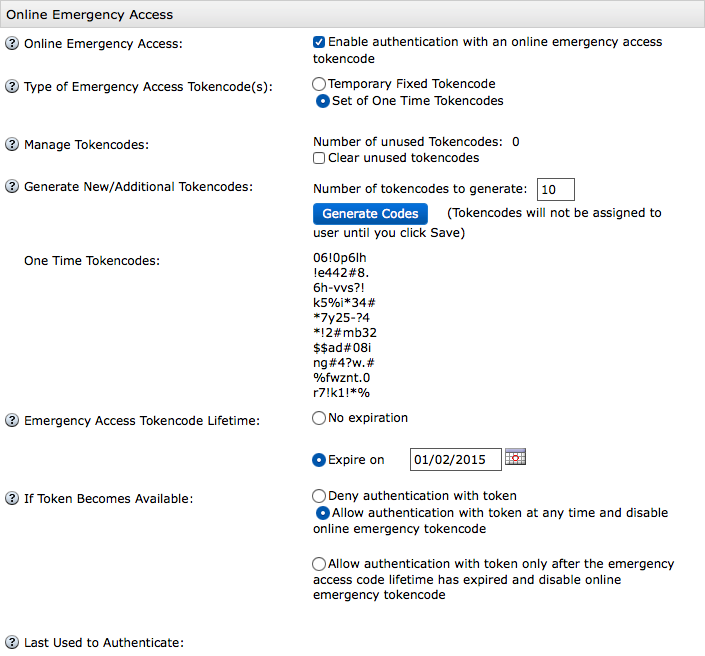 |
- Manage Tokencodes
- Checking this box will clear all unused tokencodes.
- Generate New/Additional Tokencodes
- Required. Generates the specified number of tokencodes.
Be sure to click Save at the bottom of the screen! - One Time Tokencodes
- The generated tokencodes. Distribute with care!
- Emergency Access Tokencode Lifetime
- Sets an optional expiration date on the Tokencode. Ideally this should be as short of a time as possible.
- If Token Becomes Available
- What to do with the emergency access tokencode(s) once the user has authenticated with non-emergency tokencode.
- Last Used to Authenticate
- The date/time the emergency access tokencode was used.
If a user has authenticated from an agent that can utilize offline data (such as the Windows agent) and that agent has downloaded offline data which has not expired, then the following screen will be shown:
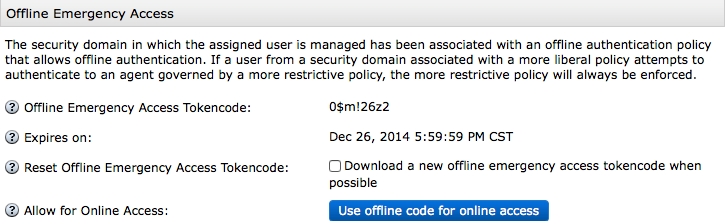 |
- Offline Emergency Access Tokencode
- The tokencode that replaces the code on the hard/soft token. Ensure that this is communicated to the user in-person, over the phone and NOT via e-mail or SMS.
- Expires on
- When the tokencode expires.
- Reset Offline Emergency Access Tokencode
- If you have reason to believe that the current tokencode has been compromised, checking the box (and saving!) will generate a new Offline Emergency Access Tokencode the next time the user authenticates online.
- Allow for Online Access
- Use the current Offline Emergency Access tokencode as an Online Temporary Fixed Tokencode. Note: must enable Online Emergency Access and select Temporary Fixed Tokencode before seeing that the code has been copied.
Agent Provisioning
Before installing the agent software, an agent record must be created on the security console.
It is important that an agent record be created prior to a client’s first attempt to authenticate against the SecurID servers. If an unregistered agent (client) attempts to authenticate an entry will be automatically created for the agent, but in the default SystemDomain which only the SecurID server admins may access. You will not be able to manage this entry until you have contacted the SecurID Server admins its-securid-admins@iastate.edu and requested that the agent record be moved to the proper security domain.
Standard Agents
Standard agents are agents that do not authenticate using RADIUS. These agents include:
- Windows agent
- Linux PAM agent
- Web agent
To add a new agent: Access ↳ Authentication Agents ↳ Add New
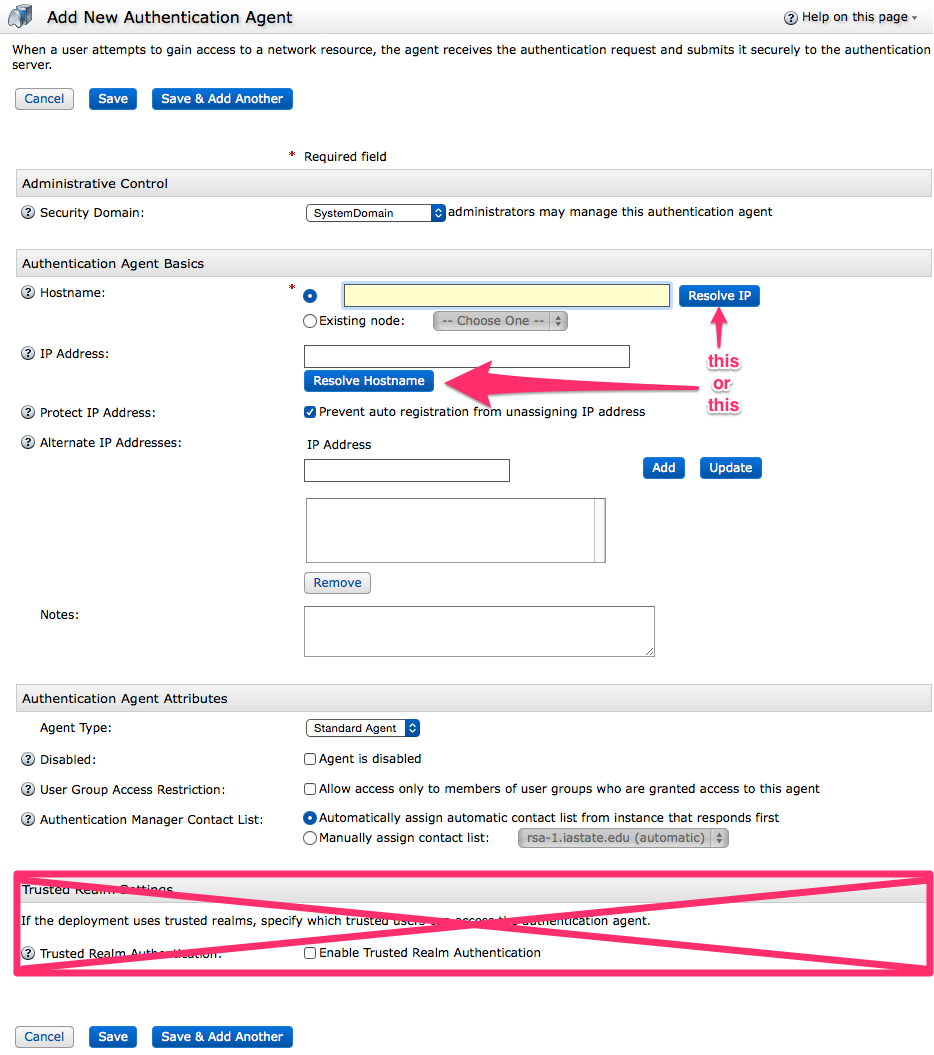 |
Administrative Control
- Security Domain
- Unless you have control over multiple domains there will be only one choice for Security Domains.
Authentication Agent Basics
- Hostname/IP Address
- Enter either the Hostname and click Resolve IP or enter the IP Address and click Resolve Hostname.
- Protect IP Address
- Leave this checked.
- Alternate IP Addresses
- If this Agent is on a multi-homed machine you may need to enter the other IPv4 addresses here.
- Notes
- A free-form field for notations.
Authentication Agent Attributes
- Agent Type
- Typically this will be Standard Agent unless the Web Agent is being used.
- Disabled
- Check this to disable the agent. Disabled agents cannot authenticate.
- User Group Access Restriction:
- Leave unchecked.
- Authentication Manager Contact List
- Set to Automatically assign automatic contact list from instance that responds first unless specifically instructed.
Trusted Realm Settings
Not currently used.
Click Save.
Radius Agents
RADIUS agents must be added to the authentication manager by the SecurID server administrators.
RADIUS requests must be made by security domain administrators only.
Please send RADIUS agent requests to its-securid-admins@iastate.edu and provide the following information:
- Agent hostname
- Agent IP address (IPv4 only)
- Security domain where the agent should be placed
- Requester name and phone (to communicate shared secret)
RADIUS agents use a shared secret to encrypt and decrypt password information between the RADIUS server (the authentication servers) and clients (agents). This shared secret will be generated by the SecurID Server Administrators and communicated to the requester in-person or by phone/voicemail. In addition, an agent record will be created for the client in the requested security domain.
Agents Behind a NAT
Provisioning one or more agents behind a NAT is possible with SecurID, but there are some minor caveats:
- Do NOT clear the node secret on the authentication manager (server), else you will have to re-populate the securid file to every agent.
- All agent authentications will come from a single host, the external NAT address, so there will be no way know which NAT agent a particular authentiation request came from.
Single Agent
In the authentication manager, create an agent entry as you would for a non-NAT agent, but use the external IP address and hostname of the router.
Multiple Agents
If there’s already an existing, working, agent behind the NAT, you will need to copy the securid file to all the other machines behind the NAT running the agent. If not, provision the first agent, perform a test authentiation, and the securid file will be created.
Linux
- /var/ace/securid contains the node secret.
Windows
C:\Program Files\Common Files\RSA Shared\Auth Data contains the node secret.
If you’re getting node secret mismatch errors, check for C:\Windows\System32\securid and C:\Windows\sysWOW64\securid and delete those verions if present. They may get recreated later, but when first setting up there should only be a securid file in the Auth Data directory.
For the first agent, you may need to configure IP Override with the external NAT IP address.